


INTRODUCTION
Welcome To Love Your Oils!
It has been my mission to get artists to use oil paints for most of the past 20 years. Obviously if you are here, then you have been tempted by the Oil Painting muse as well. In this first course of a series I will lay out the basic fundamentals of Oil Painting. My goal is to make you comfortable and unafraid of the medium, and also excited to use it right away! Start by watching the video here on the right.
About This Course

The Transition from Water Based Paints to Oil Paint
Many artists (including me) start out with some kind of water based medium such as watercolors or acrylics for various reasons. Here are a few:
Easy cleanup (especially when you don't have dedicated studio space).
No smell.
Easy to keep the colors 'clean and bright.'
Easy to get started with, as you do not need to learn too many rules.
Easy to use without worrying about safety.
Why is it then that Oil Paint is intriguing, beguiling, and calls to so many of us?
Here are just a few reasons why I love Oil Paint:
Richer colors. To my eye, oil paintings have richer color and depth than acrylic colors. (That being said, there are artists who are doing amazing acrylic color work, so there are always exceptions.)
The potential of impasto and thicker paint application. This can be achieved with acrylics with the use of mediums (brushwork with acrylic paint alone will flatten); however I still find thick oil paint to be a more organic texture and feel, and easy to use thickly.
The slow drying time of oil paint allows me to alter images without completely covering them in a new layer, and also allows me to scrape back to earlier layers. This 'excavation' is the most important feature of oil painting for me.
The texture of the paint itself. There is nothing quite like a nice buttery gob of oil paint!
In this eCourse I clarify the differences between oils and acrylics and show you tips to make the transition easier.
Let’s get started!
Course Content
I teach the Direct Method of oil painting in this eCourse (see Terms below). This allows you to easily make changes and decisions as you go. My demo is created Alla Prima, or all in one sitting, but the concepts I teach can be used in paintings that take much longer. Remembering the four basic concepts I that teach in Lesson Four will take you far in learning to use oils.
LESSON ONE – TERMS AND MATERIALS
From paint to brushes to substrates (what the heck is a substrate? You will find out here!), everything 'material-wise' that you need to know to get started. This class is PACKED with information to de-mystify all of those oil painting 'terms.'
LESSON TWO – TOXICITY AND SAFETY
What is toxic, what isn't, and how you can feel safe in your studio. This Lesson will put your mind at ease so you can have fun painting!
LESSON THREE – BASIC PRINCIPLES OF OIL PAINTING
The Basic 'Rules' of Oil Painting... They aren't too complicated, really!
LESSON FOUR – HOW TO BEGIN AN OIL PAINTING
The first half of a full length video demonstration of me painting a still life. Here we apply what we learned in the Basics along with simple techniques to get started.
LESSON FIVE – CONTINUING AND FINISHING AN OIL PAINTING
I continue and finish the still life demonstration with closeups and explanations including building up to thicker paint, keeping your colors clean, and staying loose.
HAVING TECHNICAL OR INTERNET ISSUES?
The videos in this course are now DOWNLOADABLE! If you are watching them via WIFI, however, every now and then the videos may pause or not reload. This can happen because of slow internet speed or because several people may be using your internet at the same time. To run the videos smoothly you will need a fast internet. Periodically it has to do with Vimeo and their technology. If the latter is the case, be just a bit patient. Try refreshing your browser or possibly changing your browser. Wait a few minutes and/or try watching a different video. If it is on Vimeo’s end, this problem typically resolves itself within a short amount of time.
ONLINE ART STORES AROUND THE GLOBE
I list here several options for your painting supplies. Obviously there are many more, and I cannot list one for every country; however I try to list one for almost every continent to get you started!
USA Dick Blick, Jerry's Artarama
UK Jackson's Art , Ken Bromley
AUSTRALIA The Sydney Art Store
NEW ZEALAND Takapuna Art Supplies
EU Boesner , Van Beek Art , Le Géant des Beaux-Arts
CANADA Curry's Art, Aboveground
SOUTH AFRICA Loot
STORE LOCATOR
← Click on the logo to locate stores around the world that carry GAMBLIN products.


LESSON ONE
Terms and Materials
People repeatedly ask me for explanations of various terms and materials in oil painting. I believe it is really important to start with these definitions. It seems like oil painting is made up of all kinds of terms and phrases that can appear mysterious and confusing at first, but a few definitions and explanations will open up this world for you. In this first class we will define terms and describe materials so that the shroud of mystery dissolves. Let’s start with a few Terms, and define them right away so that you can begin to feel confident with oils.
TERMS
Pigment: Color particles that create the color of your paint.
Binder: The substance in the paint that holds the pigment particles together and binds them to the support.
Support: The actual material or substrate that you apply your paint onto, such as canvas, paper, board, etc.
Fat: The term used to describe high oil content in paint and mediums. Certain colors are ‘Fat.’
Lean: The term used to describe low oil content in paint and mediums. Other colors are ‘Lean.’
(Fat and Lean come up repeatedly in Oil Painting instructions so it is good to know what they mean. See Lesson Three below.)
Artist Colors: Paint that has a high ratio of pigment to binder. In other words, the color that comes from the tube has a good amount of pigment in it.
Student Grade Colors: Paint that (generally) has a lower ratio of pigment to binder, produced for cost savings for the artist.
Viscosity: Often used to describe certain oil paints or mediums, “the state of being thick, sticky, and semifluid in consistency.”
Direct Painting: The most common approach to oil painting and what I teach in this course. Paint can be mixed on the palette or support. Composition, corrections, textures, etc. are all made directly on the support with immediate results. With this approach, a painting can be completed in one sitting (Alla Prima) or over several days, weeks, months, etc.
Indirect Painting: A far more traditional and time consuming approach which typically begins with a very specific rendering. Multiple layers of transparent oil paint are then applied (we call this ‘glazing’) over many days to create a translucent effect. This approach can create stunning effects; however it is far from intuitive. Think Rembrandt and Caravaggio.
Value: Value is a fundamental concept to art no matter what the medium. When we speak of value we are talking about the lightness or darkness of a color. Think of your color translated to a black and white photo. Is the color close to white (a light value) or black (a dark value) or somewhere in-between (a mid-value)? This concept is important to understand as I continually refer to it, as will all artists and other instructors.
MATERIALS
Please Note: Each video in this course has its own unique password.
VIDEO PASSWORD: Paint
VIDEO LENGTH: 8:51 minutes
These brands offer excellent quality for the money: Gamblin, Winsor & Newton, Lukas, Rembrandt
Gamblin, Lukas and Winsor & Newton all have Student Grade options. I do recommend that you buy the best paint that you can afford. There are dozens of other paint brands out there and many of them are excellent. I have recommended these four to simplify things as at least one of them is readily available on most continents.
Oil Paint
There are now several different kinds of oil paints available:
Traditional Oils are those made with pigment and traditional type binders such as linseed oil and safflower oils. Both Artist Oil Colors and Student Grade Colors are usually made with these traditional binders. I recommend starting with traditional oils.
Alkyd Oils are pigments that have been combined with an alkyd binder that speeds up the drying time. These can be particularly useful in underpaintings; however, you do not want to use them in top layers over Traditional Oils. A top layer must not dry faster than a bottom layer.
Water Miscible Oils are pigments that have been combined with a chemically altered binder and other additives that will mix with water. You can, therefore, clean your brushes with water instead of Mineral Spirits. You do not want to paint with the water; only use it to clean brushes. These oils need special mediums that work with the miscible binder. I, personally do NOT recommend these except under extreme circumstances of allergic reaction to oil paint. The viscosity of Water Miscible Oils is very different from Traditional Oils. More information follows below in Lesson Two.
For recommended colors look below at "Palettes."
Mineral Spirits
Also referred to as SOLVENT, TURPENTINE or 'TURPS'
You should ONLY be using Odorless Mineral Spirits (often referred to as OMS). A relatively new development in the history of oil painting, OMS have been chemically altered to be much safer to work with. You still do not want to get a lot of it on your skin and it is best to keep it covered when not in use, but it is far less toxic and flammable than turpentine and regular mineral spirits. When someone refers to SOLVENT or TURPENTINE in instructions or ingredients, you can use OMS. Most companies that supply Mineral Spirits to artists now make OMS. You will need to research what is readily available in your country as it varies greatly.
We use OMS mostly in the early stages of painting to create thin layers that dry quickly. I also use it to lightly clean brushes during an oil painting session. (See the video below).

GAMSOL Odorless Mineral Spirits
Gamsol is the safest solvent that allows oil painters to utilize all traditional painting techniques without compromise. This is my #1 recommended brand if available.
Mediums
Very basically, we use MEDIUMS in oil painting to help spread the paint without making it too thin or 'watery' in consistency. Using only OMS can make the paint more 'watery' (thin) than desired at times. Mediums help to retain the viscosity of the oil paint. We also select mediums to help slow down or speed up drying time. Some keep the brush-marks evident, while others smooth them out. Many mediums add gloss. Every MEDIUM has different properties so there is a lot to learn about them, but we can start by using just one or two. You don't need to understand every MEDIUM to begin! There are literally dozens of different kinds of MEDIUMS to choose from. Watch the video on the to see me explain a few.
Medium is also the word that we use for what type of paint we use, so that gets a bit confusing sometimes. One might ask, “What medium do you use?” And one could reply, “I use oils, but sometimes I dabble in watercolours.”
NOTE: Mediums in the video: Linseed Oil, Walnut Oil, Walnut Alkyd Oil, Liquin, Galkyd Lite, Solvent Free Fluid, Solvent Free Gel
Schmincke makes excellent mediums for those of you in Europe and countries where it can be difficult to find Gamblin.
Please Note: Each video in this course has its own unique password.
VIDEO PASSWORD: Mediums
VIDEO LENGTH: 7:15 minutes
Gesso
A ‘primer’ for your support. The oils in oil paint will cause many supports to deteriorate over time (think of olive oil dropped on a piece of paper) so the supports must be protected by a protective layer. There are different types of GESSO, but for this class, I am referring you to Acrylic Gesso which is easy to apply and cleans up with water. Of course you can also easily purchase pre-gessoed canvas and/or boards which are totally fine and generally preferable for beginners.
My favorite gesso is Utrecht Professional Acrylic Gesso.
Watch the video below to WATCH ME GESSO A CANVAS.
Please Note: Each video in this course has its own unique password.
VIDEO PASSWORD: Gesso
VIDEO LENGTH: 12:55 minutes
Brushes
The most common brushes are made of Hogs Hair, Sable, or a Synthetic fiber. The different styles are shown here. The BRIGHT is a bit deceptive as they show a large size here compared to the FLAT. Brights are very similar to FLATS, but shorter. the brushes shown here are HOGS HAIR and that is what I recommend to start with as they hold a good amount of paint and leave nice brush-marks for interesting brush-work. Sable and Synthetics tend to smooth out brush-marks.
I prefer Filberts, Flats and Rounds.

BRIGHT FILBERT FLAT ROUND
I recommend starting with at least 6 brushes. We do not clean brushes during the actual painting process as much in Oil Painting as we do in Acrylics so it is easier if you have more brushes to work with to help keep your colors 'clean.' The larger you paint, the larger you will want your brushes. If you are starting out and painting on canvases in the range of 12 x 12 inches (about 30 x 30 cm) to about 24 x 24 inches (60 x 60 cm) these would make a nice collection to begin with:
Two (2) Size 8 Filberts
Two (2) Size 6 Flats
One (1) Size 10 Round
One (1) size 4 Filbert
A word of caution about brush sizes. Sizing is not consistent throughout brands. A size 10 may be a size 4 in another brand. Very frustrating. The best option is to buy your brushes in person so you can see what you are buying until you are familiar with what brand relates to what size.
Of course you can always buy more brushes and larger brushes! You can never have too many brushes! An excellent brush for the price is Robert Simmons Signet or Escoda . I, personally, do not use expensive brushes. I buy them on sale whenever possible.
Brush Cleaners
There are many different options for cleaning brushes. Here are the three products that I recommend. You only need one, so choose whichever you prefer.
Watch the video to see how I clean my brushes. Also, click HERE to see Gamblin's recommendations on brush cleaning. I do not use a soap rinse after cleaning my brushes, however many people do. (I never have the time!) Here is the link to an excellent soap cleaner if you choose to use one. "The Masters Brush Cleaner".
Please Note: Each video in this course has its own unique password.
VIDEO PASSWORD: Brushes
VIDEO LENGTH: 6:52 minutes
Substrate of Support
A few common ones are:

ENCAUSTIC BOARD, ARCHES OIL PAPER, STRETCHED CANVAS, CANVAS WRAPPED BOARD OR PANEL
Canvas, stretched, glued to panels, etc.
Wood panels
Paper
Metal
To begin with I suggest that you use either pre-gessoed stretched canvas or canvas covered boards. Paper, Canvas paper and wood panels all have unique properties which interfere with an inexperienced painter's ability to control the paint. (Encausticbord and Gessobord by Ampersand are also great for oil painting, but I would recommend beginning with canvas).
Palettes

The PALETTE is the board or surface where we lay out our paint. It can come in many different shapes and sizes. Watch the video on the left to see me talk about why palette choice is important in Oil Painting, and also how to lay out your Oil Paints.
Below are the recommended colors for a beginning palette. They include a warm (W) and cool (C) color for each primary. As mentioned in the paint and safety sections, feel free to buy “Hues” in place of true Cadmiums.
Please Note: Each video in this course has its own unique password.
VIDEO PASSWORD: Palette
VIDEO LENGTH: 7:51 minutes
Palette Knife
PALETTE KNIVES have many uses in Oil Painting, from scraping off paint, to applying paint to mixing and more. As I develop these courses I will explain their multiple uses further, but for this first eCourse I recommend that you have at least one. Here is a link to my favorite, Style #10.
Miscellaneous Items
PAPER TOWELS OR RAGS, you will need some. I prefer VIVA paper towels in the USA, as they are the most absorbent for oils in my opinion. They are a bit more expensive but I use fewer of them.
PLASTIC WRAP (SARAN WRAP), you may want this to cover your paints to help keep them ‘wet.’
PALETTE BOX, some people like to keep their palettes/paints in these boxes, again to help keep the paints ‘wet’. As seen in the ‘Palette Video.’
GLOVES, this is the link to the gloves that you see me wear throughout my eCourses. They are nitrile on the bottom and fabric on the top. The nitrile prevents solvent and paint from coming into contact with your skin. The top fabric part breathes so they are really quite comfortable. Much better than the disposable ones which are also bad for the environment! I like wearing them because I am messy.

A New Must Have Book!
This incredibly comprehensive book has just been published (2022). I highly recommend it to any oil painter. It must have taken years to write and assemble. It is much more than a color manual. It is packed with information on the art of oil painting.Whatever it is, the way you tell your story online can make all the difference.


LESSON TWO
Toxicity and Safety
Toxicity and safety are the two most common concerns of students unfamiliar with oil paints. In this section I hope to clarify these issues and to put your mind at ease so that you are never again fearful of the materials.
Please Note: Each video in this course has its own unique password.
VIDEO PASSWORD: Safe
VIDEO LENGTH: 10:32 minutes
To hear a GREAT discussion of this topic by an expert, listen to the PODCAST below. It is an interview by Savvy Painter (Antrese Wood) with GAMBLIN’s president Pete Cole. Go to 46:55 to begin with this discussion. And, of course, listen to the entire interview for answers to many more questions about oil painting!
Clarification: Paint colors that say “Hue” are generally not toxic. Read the label to see what pigments are actually used to be sure.
What to do with your dirty OMS? Don’t throw it away!
Watch the video below on how to properly dispose of your dirty OMS.
Please Note: Each video in this course has its own unique password.
VIDEO PASSWORD: OMS
VIDEO LENGTH: 2:18 minutes


LESSON THREE
Basic Principles Of Oil Painting
Please Note: Each video in this course has its own unique password.
VIDEO PASSWORD: Basics
VIDEO LENGTH: 15:25 minutes
BASIC PRINCIPLES
I give you these with the caveat that ALL RULES CAN BE BROKEN. You will inevitably find artists who work in direct conflict with the following concepts. These principles are, however, traditional oil painting “rules” used by most beginning (and experienced) painters. Once you understand your materials, feel free to break the rules!
Put a light wash of medium value color on your support. Acrylic paint must be dry and oil paint should preferably be dry before you begin.
Work “Dark to Light.” Put your darker colors on first.
Work “Thin to Thick.” Start with thinner paint layers, possibly thinned some with OMS if you are using it.
Consider working “Back to Front.” Once your composition is in place and you have your dark shapes massed in, consider working the background up to the foreground as you paint, but not finishing any one area.
“Dance Around the Painting,” keeping it developed in similar stages throughout your process. In other words, do not "finish" one section and then move to another. This is not contradictory to #4 above.

CLICK ON THE LOGO
FAT OVER LEAN
Many artists find this concept a bit confusing so don't be too concerned if you do too. Click on the WIKIPEDIA logo to visit the WIKIPEDIA page that will give you a good explanation. I personally believe the more important concepts to remember are the basic principles listed above. Working “Thin to Thick” will, for the most part, take care of working “Fat over Lean.”


LESSON FOUR
How To Begin An Oil Painting
Oil Painting Demo - Part One
In this demo I work on an acrylic toned canvas which had an unfinished acrylic painting underneath. This is what you see on the canvas when I begin the painting. I will often paint directly over old paintings and encourage you to do so as well. Just keep in mind the rules that I laid out in the Basics. Acrylic should be very thin and very dry. Oil paint should be dry to the touch as well, or you will be working “wet into wet.” Acrylics should never be painted over oils, so do not put a layer of acrylic paint over an old oil painting thinking you will start fresh. The acrylic will not adhere to the oil, and your painting's surface will crack and fall apart over time.
Please Note: Each video in this course has its own unique password.
VIDEO PASSWORD: Begin
VIDEO LENGTH: 22:28 minutes
In this first half of the full length OIL PAINTING DEMO I show the beginning steps of painting a still life. I use all of the concepts that we learned in The Basics Lesson. Additional take-aways from this lesson are:
I begin the sketch with Ultramarine Blue Oil Paint. I use this color for the following reasons: it is dark and readable; it does not interfere with my other colors later in the process; I like the dark line it can leave, and it is not hugely expensive. If you prefer to use charcoal that is OK too, but since I'm a painter, I have always used paint. It is best not to use graphite as that can end up interfering with your paint colors later on. Do NOT use staining colors like Phthalos, Alizarines or Dioxazines for your initial sketch!
When you first learn to paint with oils it can be difficult to keep your colors ‘clean’ because they do not dry immediately, and because you do not continually wash the brush the same way you do with water-based media. Keeping good control of your colors is a learning process and will take some practice to fully understand. One great way to help keep your colors clean, especially while you are learning, is to use a different brush for each color. This way you do not need to clean your brush when changing colors. At the very minimum you will want a brush for light values and another for dark values. Simply wiping your brush after several strokes can also help.
Do not paint the background across the entire canvas and underneath your subject matter unless you are planning to let it dry for several days. Oil painters paint each object individually and cut 'backgrounds' and foregrounds around the subject matter.
Stay away from white for most of the beginning of the painting process. White can easily muddy a painting and also create a 'chalky' look. Remember, it tends to be thicker as well, and we want to stay thin in the beginning. Try to hold off on white for as long as possible. Possible exceptions are the backgrounds and skies.
MATERIALS USED:
PAINT COLORS:
Titanium White
Lemon Yellow
Cadmium Yellow Medium Hue
Cadmium Yellow Deep Hue
Cadmium Orange Hue
Napthol Scarlet (Similar to Cad. Red Light)
Quinachridone Red (similar to Alizarin Crimson)
Sap Green (Winsor & Newton)
Viridian
Cerulean Blue Hue
Ultramarine Blue
Van Dyke Brown (a warm black)
*Gold Ochre (added to palette)
Medium : Gamblin Solvent Free Gel
OMS: Gamblin Gamsol
*The very large tube of Gold Ochre paint that I use here is from Classic Artist Oils. They are an excellent resource for paint if you live in the USA and specifically on the West Coast. Their ‘Squeeze’ Tubes are 4oz and their ‘Caulking’ Tubes (what I used) are 10oz. They also call this Yellow Ochre, but it is closer to Gold Ochre in most other brands.

FEEL FREE TO USE THIS IMAGE FOR YOUR OWN PAINTING!


LESSON FIVE
……….…….……..
Continuing And Finishing An Oil Painting
Oil Painting Demo - Part Two

JOAN BROWN, “PORTRAIT OF LUPE”
I continued the still life on the same day so all of the paint was equally wet. If you have to take a break in your process for a day or two, you will want your painting to either be: 1. Very wet. 2. Dry to the touch (which it probably will be if you have been painting thinly), or 3. Very close to dry to the touch (barely sticky). If it is very sticky then the paint will not go on smoothly and you could potentially have problems with cracking or what we call ‘elephant skin’ wrinkling in the future. This wrinkling is caused by the under layer drying slower than the new upper layer. Some artists actually do not mind this effect. The fantastic painting by Joan Brown on the right, who often had lots of wrinkling in her thick work (look to the left of the head). After a few paintings you will learn what the appropriate level of 'dryness' is to begin your next layer.
Please Note: Each video in this course has its own unique password.
VIDEO PASSWORD: Continue
VIDEO LENGTH: 26:56 minutes
After you have some experience with oil painting, the four basic concepts become second nature and you don’t really think about them during your painting process. Additional take-aways from this Lesson are:

Continue throughout the process to check your values. Are your darks dark enough and your lights light enough?
Work from back to front even within objects such as flowers or vases. Paint what is 'furthest away from you' first.
Again, work up to using your white slowly.
Paint the dark values of each object/color first. It is easy to lighten a color, but difficult to get back to a rich dark.
Try not to overwork your brushstrokes or 'scrub' your painting. Think of placing the paint on the canvas with a few strokes and then going back to the palette to get more paint.
Wipe your brush often.
Remember, the painting is YOUR creation! You can manipulate the composition (remove or add flowers for instance), and change the background color, etc. This is one place where you are not beholden to reality.
Cleaning Your Palette
A quick demo on cleaning your palette, and what to do if you forget. I also talk about mud and saving your paint!
Please Note: Each video in this course has its own unique password.
VIDEO PASSWORD: Clean
VIDEO LENGTH: 9:00 minutes
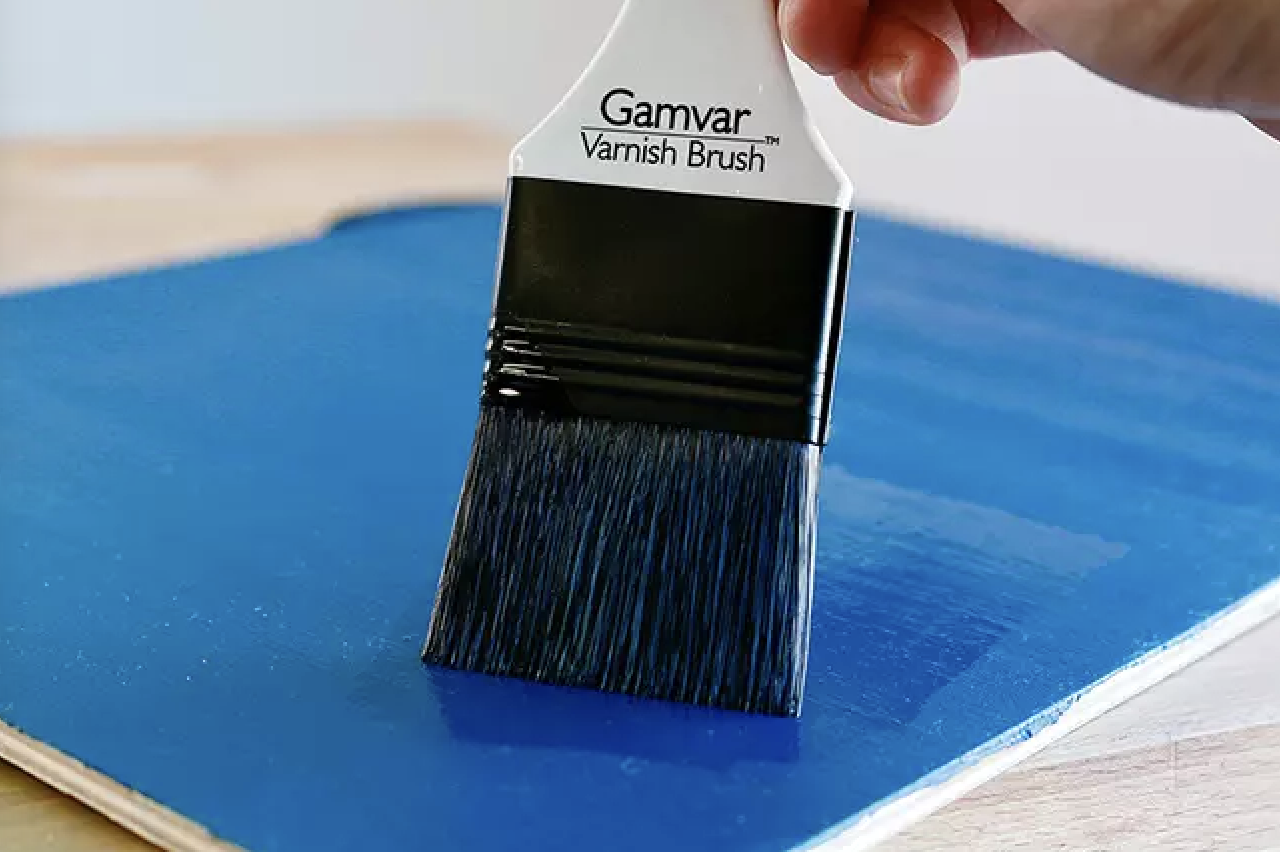
Varnish
Many artists finish their paintings with a layer of varnish. Varnish must be applied after the painting has fully dried. Depending on the thickness of the paint, a painting can take anywhere from six months to a year (or more if it is super thick!) to dry. Varnish comes in different sheens ranging from High Gloss to Matte. Varnish is typically brushed on with a wide, smooth synthetic or bristle brush, which leaves the fewest amount of brush strokes.
Artists varnish their paintings for the following reasons:
Often some areas of a painting will dry with a flatter finish, and other areas end up glossy. Varnish will even out the finish of a painting.
Varnish will bring out the rich darks that can dull or flatten when dry. With varnish applied, the appearance can be closer to the look of when the painting is wet.
Varnish can protect a painting.
This video below by GAMBLIN explains the process of varnishing. The concepts can be used with other varnish product as well. However, the GAMBLIN product may be easier to remove than other products.

Krylon Kamar Varnish
Provides clear, lasting protection for oil, acrylic, and water-based paints. It is free of the impurities found in natural varnish, so it will not yellow with age. It allows reworking of the painting, and it can be safely removed by conservators for restoration.
Spray can contains 11-oz (312-gr) net weight.
Once a varnish is applied the painting becomes 'unworkable.' In other words, you may not go back and change or paint over it as the new oil paint will not adhere well to the varnish. (This is quite different from applying a layer of gloss or matte medium to an acrylic painting where you can continue to work on it later.) You would need to remove the varnish to continue to work on an oil painting, and that is no easy task. (Even though the Gamblin video claims it is easy, this is actually time consuming and a delicate process).
A modern alternative to traditional varnishes is a spray varnish which is ‘workable.’ There are several of these on the market. I have successfully used the Krylon Kamar Varnish pictured to the right. It has a satin sheen (not too glossy) and can be applied about three months into the drying process instead of six. To apply, I spray a painting in even passes in one direction, wait 10 minutes, and then turn the canvas and spray again at 90 degrees to the first direction. I will repeat this until the painting has the right degree of sheen and coverage.
All that being said, many artists choose not to varnish their paintings. Depending on the painting I often prefer the matte, flatter finish, or even matte in one area and gloss in another. I also like to know that I can easily change a painting in the future if I choose to do so.
Why Should I Varnish My Painting?
Visit the GAMBLIN website to read more about the reasons for this important step.

IT’S A WRAP!
Thank you for choosing this Essentials eCourse!
I hope that I have answered many of your questions regarding the fundamentals of oil painting. I also hope that you are now confident in your knowledge about safety issues regarding mediums and oils.
The best way to learn is to paint lots of paintings. Try to keep that sense of play and experimentation in your work. Enjoy the process and don't worry too too much about the outcome! Get a good sized brush or palette knife, move some paint around and have fun!
I hope you enjoyed your time here, and remember...KEEP ON PAINTING!
Please Note: Each video in this course has its own unique password.
VIDEO PASSWORD: Bye4Now
VIDEO LENGTH: 2:00 minutes
(Be sure and watch to the END)